

How to Construct a 90° Angle: Step-by-Step Instructions
How to construct a 90° angle is an important geometry topic that helps learners understand the basics of angle construction using simple tools such as a ruler and compass. This concept builds strong foundational skills in mathematics by showing how to make an exact 90° angle through clear and step-by-step geometric methods. It is useful for students because it improves accuracy, develops problem-solving skills and supports learning in school exams and practical geometry work. In this guide, you’ll learn a simple and accurate method for constructing a 90° angle.
Table of Contents
- How to Construct a 90° Angle
- How to Check If Your Construction Is Exactly 90°
- Common Mistakes to Avoid
- Frequently Asked Questions of How to Construct a 90° Angle

How to Construct a 90° Angle
A 90° angle, known as a right angle, is formed when two rays meet in such a way that they split a straight line exactly in half.
Materials Required to Construct a 90° Angle:
-
A pencil
-
A ruler or straightedge (for drawing straight lines only)
-
A pair of compasses that can hold its width steady
Constructing a 90° Angle Using a Compass and Ruler
Step 1: Draw a line segment of any convenient length using your ruler. Label the endpoints A and B.

Step 2: Open the compass to any width and, keeping the needle fixed at A, draw an arc that cuts line AB at a point. Label this point C.
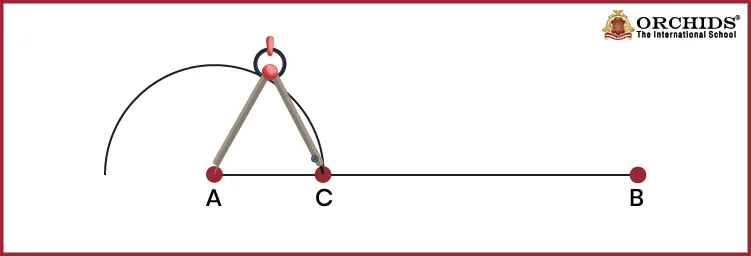
Step 3: Without changing the compass width, place the needle at D and draw another arc that cuts the first arc. Label the new point D.
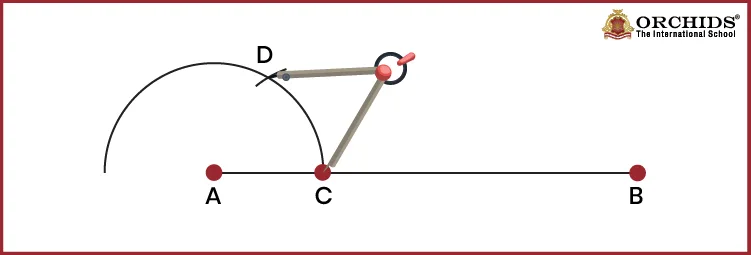
Step 4: Keeping the same width, place the needle at D and draw one more arc above the line. Label this point E.
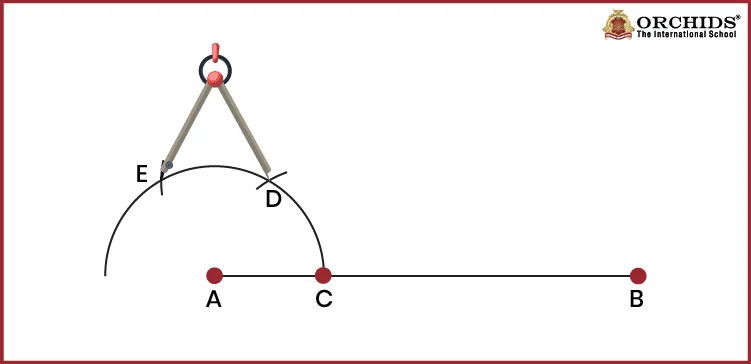
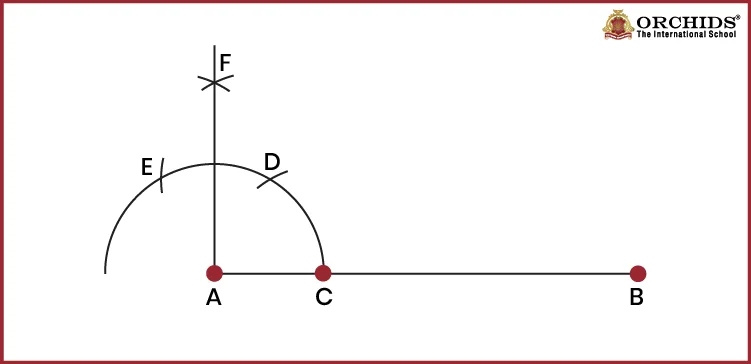
Step 5: With the same compass width, draw two arcs: one centred at D and one centred at E so that they cross each other above the line. Mark this crossing point F.
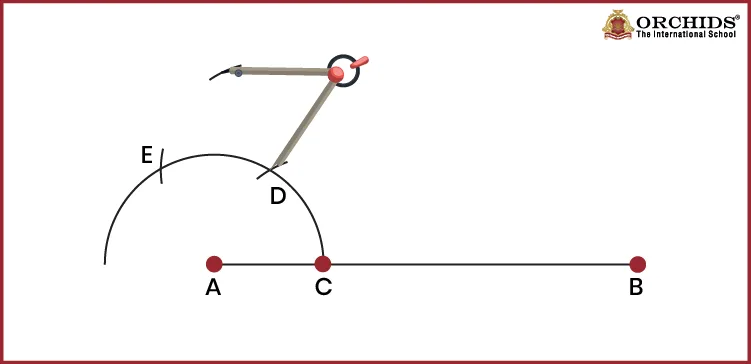
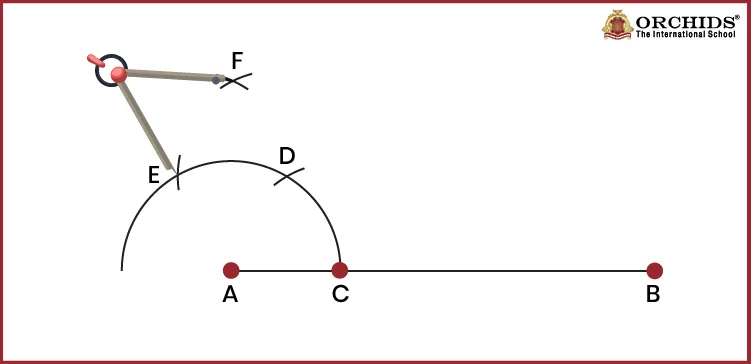
Step 6: Using your ruler, join A to F. The angle ∠FAB is exactly 90°.
How to Check If Your Construction Is Exactly 90°
Once your construction is complete, verify if the final angle is exactly 90°.
-
Place the protractor's centre on the vertex and its baseline along one arm. The other arm should pass exactly through the 90° mark.
-
Slide the right-angled corner of a set square against both arms; there should be no visible gap on either side.
-
Fold your paper along one arm and check whether the other arm lies flat against itself, since a true right angle is exactly half of a straight angle.
Common Mistakes to Avoid
-
Changing the compass width mid-construction
Even a slight accidental squeeze of the compass between steps 2 and 5 throws off every arc that follows. Set the width once and avoid touching the compass hinge again until the construction is finished.
-
Using a blunt pencil
A blunt tip makes arcs thicker, so intersection points become difficult to pin down precisely, and small errors can affect the final angle.
-
Reading the wrong scale on the protractor
Protractors print two number rows. Always trace from the 0° that starts on the same side as your baseline arm.
-
Not labelling points as you go
Skipping labels (C, D, E, F) makes it easy to lose track of which arc came from which centre, as this is a multi-step construction.
Frequently Asked Questions of How to Construct a 90° Angle
1. Can a 90° angle be constructed without a protractor?
Yes. Using only a compass and ruler, drawing a series of equal-radius arcs produces an exact 90° angle without ever reading a scale.
2. What is the difference between constructing and measuring a 90 degree angle?
Measuring uses a protractor scale and depends on careful placement and reading. Construction uses only a compass and straightedge, so the accuracy comes from geometry rather than from reading a scale correctly.
3. How can I check if my constructed angle is exactly 90 degrees?
Place a protractor's centre on the vertex with its baseline on one arm; the other arm should meet the 90° mark exactly. A set square's right-angle corner should also fit against both arms with no gap.
4. In which class do CBSE students learn to construct a 90° angle?
Right angles are introduced in Class 6, while formal compass-and-ruler constructions of standard angles (such as 90° and 60°) are taught in later practical geometry chapters.
Numbers make sense when they're taught right. To see how Orchids The International School turns Maths from intimidating to intuitive, reach out to our admissions team.


Admissions Open for 2026-27
What type of concept pages would you prefer?
CBSE Schools In Popular Cities
- CBSE Schools in Bangalore
- CBSE Schools in Mumbai
- CBSE Schools in Pune
- CBSE Schools in Hyderabad
- CBSE Schools in Chennai
- CBSE Schools in Gurgaon
- CBSE Schools in Kolkata
- CBSE Schools in Indore
- CBSE Schools in Sonipat
- CBSE Schools in Delhi
- CBSE Schools in Rohtak
- CBSE Schools in Bhopal
- CBSE Schools in Aurangabad
- CBSE Schools in Jabalpur
- CBSE Schools in Jaipur
- CBSE Schools in Jodhpur
- CBSE Schools in Nagpur
- CBSE Schools in Ahmednagar
- CBSE School In Tumkur











Orchids The International School is one of India's leading chains of CBSE and ICSE schools, with 110+ schools across the country.